How to Add External Email Warning Message – Prevent Email Spoofing
Zitat von mpachmann am 17. Juli 2023, 11:15 Uhrhttps://o365reports.com/2020/03/25/how-to-add-external-email-warning-message/
Email is a valuable communication tool that helps to reach people globally. So, hackers are increasingly targeting emails for their Phishing attacks. Phishing attacks are not new, but hackers use new phishing techniques that are challenging and hard to trace. Generally, phishing attacks used to steal sensitive information.
Email spoofing is one of the phishing attacks where the sender looks legitimate at first sight but not. For example, A new phishing attempt targeted on Office 365 users – Here, the sender shows himself as a ‘Company Director’ but, actually not.
How to Prevent Email Spoofing in Office 365?
To prevent email spoofing, first, we need to find the source of the scammers. Generally, it can be categorized as follows.
- Spoofing email from a trusted domain or same as a user domain
- Spoofing email from known user name with an external domain
Spoofing email from trusted domains: Some times, spoofed emails look like originated from trusted domains or the same as your domain but not. Spammers can easily spoof the ‘From’ address. So, the user in ‘contoso. com‘ can receive emails from the attacker with xyz@contoso.com header. To prevent these kinds of spoofing, you can configure DKIM (DomainKeys Identified Mail), SPF(Sender Policy Framework), etc.
Spoofing email from the external domains: In some other cases, attackers will register a domain for a company which they are impersonating. For example, ‘conteso. com’ instead of ‘contoso. com’. Since the mail originated from valid domain, DKIM can’t identify the spam email. As a security precaution, it’s good to alert your organization members when they receive mail from an external source.
To prevent email name spoofing, you can alert users by adopting few following methods.
- Prepend “External” to subject line for incoming external emails
- External sender warning/disclaimer
You can use the Exchange Transport rule to mark external emails.
Configure External Email Warning message for Office 365 Emails:
You can use the below methods to add external tag in Outlook emails that are originating from outside of your organization.
1.Configure external email warning through Transport rule
- Set an External Email warning message through PowerShell
- Configure External Sender warning message through Exchange Admin Center (EAC)
2.Enable External tagging in Outlook using native cmdlet
PowerShell Script to set External Email Warning Message:
The Exchange transport rule can be created using the ‘New-TransportRule’ cmdlet. While creating the rule, we can specify conditions, exemptions, and actions.
To configure a mail flow rule for external email messages, we need to set the following conditions.
– Sender is located outside the organization
– Receiver is located inside the organization
I have created a PowerShell script to set up a mail flow rule for external mail. The script creates the mail-flow rule that adds ‘External’ to the subject line and external warning message in the mail for incoming external emails. You will be alerted like a screenshot below.
Script Highlights:
- This script can be executed with MFA enabled account too.
- Prepends “External” to subject line for incoming external emails
- Adds “External Disclaimer” for external emails
- You can exclude group mailboxes like support, sales that facing external world.
Download Script: ExternalWarningRule.ps1
How to Execute the External warning message script:
After downloading script, execute the script as follows based on your need:
To add alert to all external mails:
If you want to add external warning message to all incoming emails that originated from outside of the organization, execute the script as shown below.
To add alert to all external emails except some group members:
In some situation, you don’t want to add ‘External’ alert to some groups’ members. In that case, you can exclude warning for those group’s members. You can exclude group members by mentioning groups using -ExcludeGroupMembers param.
To exclude external alert to specific mailboxes:
To exclude external alert for some specific mailboxes like support, sales mailboxes, you can use ‘ExceptIfAnyOfToCCHeader’ parameter. To exclude recipients, run the script with -ExcludeMB param.
Note: ExcludeMB checks values for To and CC fields and all the recipients of the mail are affected by this rule, not just the detected recipient.
Execute this script with MFA enabled account:
To run this script with MFA enabled account, run the script with –MFA switch.
To execute this script by passing credential as a parameter:
Instead of typing in popup, you can pass credential for non-MFA account by using –UserName and –Password params.
Configure External Sender Warning Message through EAC:
Step 1: Login to EAC and go to ‘mail flow’. Click ‘+’ to create a new rule.
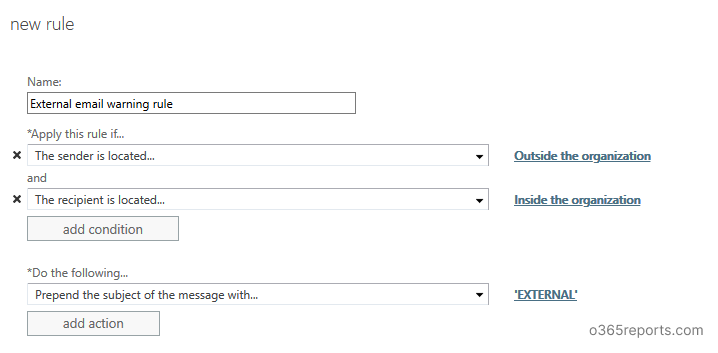
Step 2: Give a name for the rule. Eg: External email warning rule
Step 3: In ‘Apply this rule if’, select ‘the sender is located in’ – Outside the organization. And add one more rule by clicking ‘More options…’ at the bottom of the popup. Then click ‘Add condition’ to add recipient filer.
Step 4: Set ‘Prepend the subject of the message with’ as [External]:.
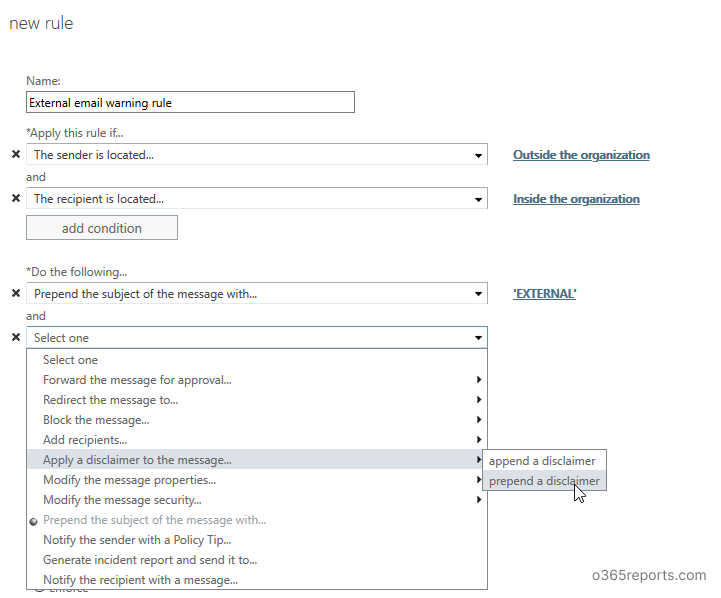
Step 5: If you want to add a disclaimer for external mail, click ‘add action’. Select ‘Apply a disclaimer to the message’ –> ‘Prepend a disclaimer’.
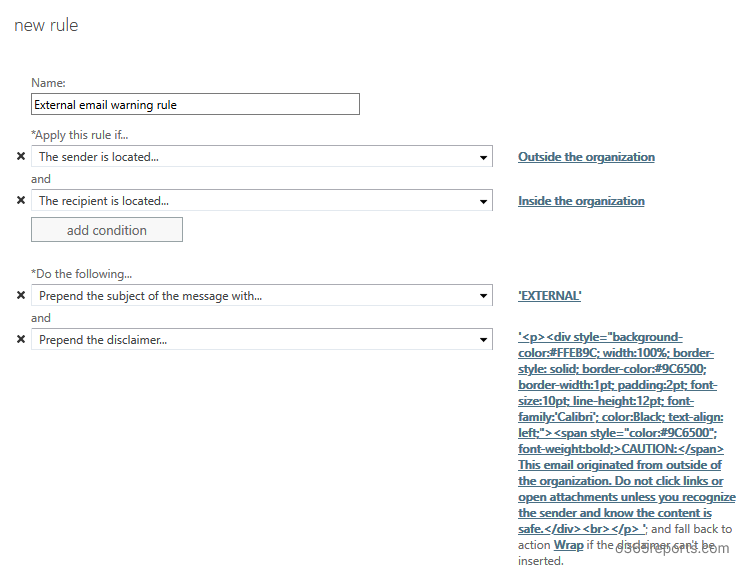
– Specify the disclaimer text. You can copy and paste the below text:
<div id=”footer” style=”background-color: #ffeb9c; width: 100%; border: 1px solid #FFEB9C; padding: 2pt; border-style: solid; border-color: #9C6500;”> CAUTION: This email originated from outside of the organization. Do not click links or open attachments unless you recognize the sender and know the content is safe.</div>
-Specify fallback action as ‘Wrap’
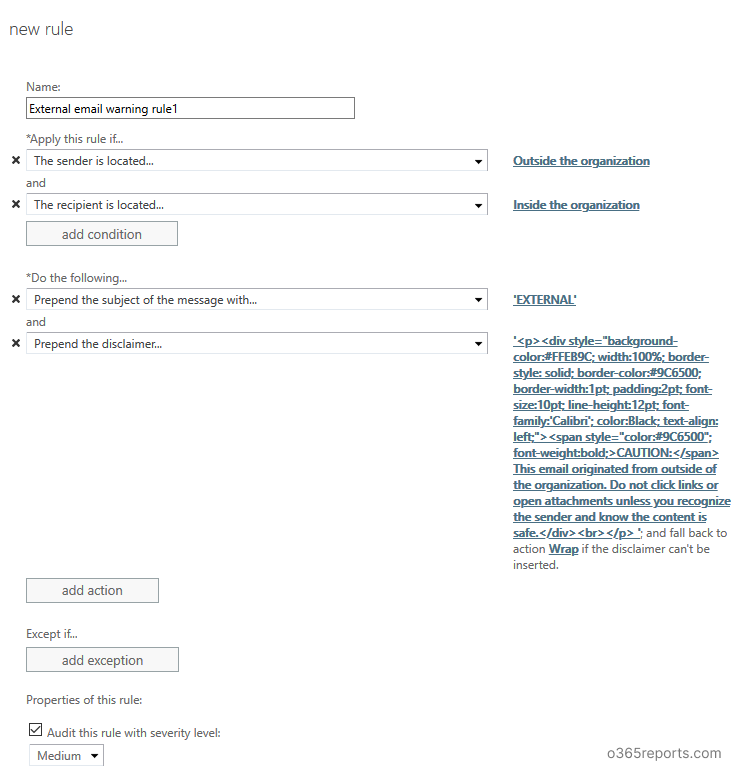
Step 6: If you want to include any exceptions, you can use ‘Except if’. Here, I have used ‘if the recipient available in To or CC field’.
Step 7: Set rule severity based on the other rules in your organization.
Step 8: Save the rule.
Now, when you get emails from external senders, ‘External’ added in the subject and ‘External email warning disclaimer’ shown in the mail content. You will be alerted like a below screenshot.
Conclusion:
Setting up mail flow rule is not difficult, but it effectively protects us against phishing attempts like domain spoofing, name spoofing, etc. However, this is not a perfect solution. Microsoft continuously working to defend such types of attacks. Customers who have Office 365 Enterprise E5 or Advanced Threat Protection (ATP) can access the Spoof intelligence in the Office 365 Security & Compliance Center.
I found the problem - there were some trailing spaces in the HTML code.
This what I started with, pasted from this post:
<div id="”footer”" style="”background-color:" #ffeb9c;="" width:="" 100%;="" border:="" 1px="" solid="" #ffeb9c;="" padding:="" 2pt;="" border-style:="" solid;="" border-color:="" #9c6500;”=""> CAUTION: This email originated from outside of the organization. Do not click links or open attachments unless you recognize the sender and know the content is safe.</div>
This is what I now have - note the spaces after the : character for each of the settings has been removed:
<div id="footer" style="background-color:#ffeb9c; width:100%; border:1px solid #FFEB9C; padding:2pt; border-style:solid; border-color:#9C6500;"> CAUTION: This email originated from outside of the organization. Do not click links or open attachments unless you recognize the sender and know the content is safe.</div>
Thanks for the post - I have no idea how to craft HTML so this was a l great help!
How to Add External Email Warning Message – Prevent Email Spoofing in Office 365
Email is a valuable communication tool that helps to reach people globally. So, hackers are increasingly targeting emails for their Phishing attacks. Phishing attacks are not new, but hackers use new phishing techniques that are challenging and hard to trace. Generally, phishing attacks used to steal sensitive information.
Email spoofing is one of the phishing attacks where the sender looks legitimate at first sight but not. For example, A new phishing attempt targeted on Office 365 users – Here, the sender shows himself as a ‘Company Director’ but, actually not.
How to Prevent Email Spoofing in Office 365?
To prevent email spoofing, first, we need to find the source of the scammers. Generally, it can be categorized as follows.
- Spoofing email from a trusted domain or same as a user domain
- Spoofing email from known user name with an external domain
Spoofing email from trusted domains: Some times, spoofed emails look like originated from trusted domains or the same as your domain but not. Spammers can easily spoof the ‘From’ address. So, the user in ‘contoso. com‘ can receive emails from the attacker with xyz@contoso.com header. To prevent these kinds of spoofing, you can configure DKIM (DomainKeys Identified Mail), SPF(Sender Policy Framework), etc.
Spoofing email from the external domains: In some other cases, attackers will register a domain for a company which they are impersonating. For example, ‘conteso. com’ instead of ‘contoso. com’. Since the mail originated from valid domain, DKIM can’t identify the spam email. As a security precaution, it’s good to alert your organization members when they receive mail from an external source.
To prevent email name spoofing, you can alert users by adopting few following methods.
- Prepend “External” to subject line for incoming external emails
- External sender warning/disclaimer
You can use the Exchange Transport rule to mark external emails.
Configure External Email Warning message for Office 365 Emails:
You can use the below methods to add external tag in Outlook emails that are originating from outside of your organization.
1.Configure external email warning through Transport rule
- Set an External Email warning message through PowerShell
- Configure External Sender warning message through Exchange Admin Center (EAC)
2.Enable External tagging in Outlook using native cmdlet
PowerShell Script to set External Email Warning Message:
The Exchange transport rule can be created using the ‘New-TransportRule’ cmdlet. While creating the rule, we can specify conditions, exemptions, and actions.
To configure a mail flow rule for external email messages, we need to set the following conditions.
– Sender is located outside the organization
– Receiver is located inside the organization
I have created a PowerShell script to set up a mail flow rule for external mail. The script creates the mail-flow rule that adds ‘External’ to the subject line and external warning message in the mail for incoming external emails. You will be alerted like a screenshot below.

Script Highlights:
- This script can be executed with MFA enabled account too.
- Prepends “External” to subject line for incoming external emails
- Adds “External Disclaimer” for external emails
- You can exclude group mailboxes like support, sales that facing external world.
Download Script: ExternalWarningRule.ps1
How to Execute the External warning message script:
After downloading script, execute the script as follows based on your need:
To add alert to all external mails:
If you want to add external warning message to all incoming emails that originated from outside of the organization, execute the script as shown below.
|
1
|
./ExternalWarningRule.ps1
|
To add alert to all external emails except some group members:
In some situation, you don’t want to add ‘External’ alert to some groups’ members. In that case, you can exclude warning for those group’s members. You can exclude group members by mentioning groups using -ExcludeGroupMembers param.
|
1
|
./ExternalWarningRule.ps1 -ExcludeGroupMembers Customers@contoso.com,salesExecutives@contoso.com
|
To exclude external alert to specific mailboxes:
To exclude external alert for some specific mailboxes like support, sales mailboxes, you can use ‘ExceptIfAnyOfToCCHeader’ parameter. To exclude recipients, run the script with -ExcludeMB param.
|
1
|
./ExternalWarningRule.ps1 -ExcludeMB support@contoso.com,sales@contoso.com
|
Note: ExcludeMB checks values for To and CC fields and all the recipients of the mail are affected by this rule, not just the detected recipient.
Execute this script with MFA enabled account:
To run this script with MFA enabled account, run the script with –MFA switch.
|
1
|
./ExternalWarningRule.ps1 -MFA
|
To execute this script by passing credential as a parameter:
Instead of typing in popup, you can pass credential for non-MFA account by using –UserName and –Password params.
|
1
|
./ExternalWarningRule.ps1 -UserName admin@contoso.com -Password XXXX
|
Configure External Sender Warning Message through EAC:
Step 1: Login to EAC and go to ‘mail flow’. Click ‘+’ to create a new rule.
Step 2: Give a name for the rule. Eg: External email warning rule
Step 3: In ‘Apply this rule if’, select ‘the sender is located in’ – Outside the organization. And add one more rule by clicking ‘More options…’ at the bottom of the popup. Then click ‘Add condition’ to add recipient filer.
Step 4: Set ‘Prepend the subject of the message with’ as [External]:.

Step 5: If you want to add a disclaimer for external mail, click ‘add action’. Select ‘Apply a disclaimer to the message’ –> ‘Prepend a disclaimer’.

– Specify the disclaimer text. You can copy and paste the below text:
<div id=”footer” style=”background-color: #ffeb9c; width: 100%; border: 1px solid #FFEB9C; padding: 2pt; border-style: solid; border-color: #9C6500;”> CAUTION: This email originated from outside of the organization. Do not click links or open attachments unless you recognize the sender and know the content is safe.</div>
-Specify fallback action as ‘Wrap’

Step 6: If you want to include any exceptions, you can use ‘Except if’. Here, I have used ‘if the recipient available in To or CC field’.

Step 7: Set rule severity based on the other rules in your organization.

Step 8: Save the rule.
Now, when you get emails from external senders, ‘External’ added in the subject and ‘External email warning disclaimer’ shown in the mail content. You will be alerted like a below screenshot.

Conclusion:
Setting up mail flow rule is not difficult, but it effectively protects us against phishing attempts like domain spoofing, name spoofing, etc. However, this is not a perfect solution. Microsoft continuously working to defend such types of attacks. Customers who have Office 365 Enterprise E5 or Advanced Threat Protection (ATP) can access the Spoof intelligence in the Office 365 Security & Compliance Center.
I found the problem - there were some trailing spaces in the HTML code.
This what I started with, pasted from this post:
<div id="”footer”" style="”background-color:" #ffeb9c;="" width:="" 100%;="" border:="" 1px="" solid="" #ffeb9c;="" padding:="" 2pt;="" border-style:="" solid;="" border-color:="" #9c6500;”=""> CAUTION: This email originated from outside of the organization. Do not click links or open attachments unless you recognize the sender and know the content is safe.</div>
This is what I now have - note the spaces after the : character for each of the settings has been removed:
<div id="footer" style="background-color:#ffeb9c; width:100%; border:1px solid #FFEB9C; padding:2pt; border-style:solid; border-color:#9C6500;"> CAUTION: This email originated from outside of the organization. Do not click links or open attachments unless you recognize the sender and know the content is safe.</div>
Thanks for the post - I have no idea how to craft HTML so this was a l great help!

