How to Clean Up System Volume Information Folder on Windows
Zitat von mpachmann am 28. Juni 2024, 9:26 Uhrhttps://woshub.com/how-to-clean-up-system-volume-information-folder/
Windows automatically creates a hidden System Volume Information directory in the root of each connected NTFS drive (whether a local HDD/SSD drive or a removable USB drive). The size of the Volume Information Directory may be tens or hundreds of GBs, occupying most of the hard drive free space. This article explains how the System Volume Information folder is used in Windows, what is stored in it, and how to clean it properly.
Contents:
What is the System Volume Information Directory and How to Access It
The System Volume Information directory is located at the root of each Windows hard disk drive and is hidden by default. To view this directory, enable Windows File Explorer to show system files (Options -> View -> uncheck Hide protected operation system files (Recommended)).
This directory can only be accessed by the NT AUTHORITY\SYSTEM account. Even the built-in Windows administrator won’t be able to open and view the contents of the System Volume Information directory. If you try to open the folder in the File Explorer, you will get an error:
 Location is not available.
C:\System Volume Information is not accessible.
Access is denied.
To open the System Volume Information directory in File Explorer, you can set yourself as the owner and grant NTFS permissions. For example, using the commands:
takeown /f "C:\System Volume information"

icacls "C:\System Volume Information" /grant woshub\jwolf:F
But it doesn’t make a lot of sense. In addition, you may accidentally delete important files from the folder.
To restore the original permissions on the System Volume Information folder, run:
icacls "C:\System Volume Information" /setowner "NT Authority\System"

icacls "C:\System Volume Information" /remove woshub\jwolf
You can view the contents of the System Volume Information directory by running the PowerShell console with NT AUTHORITY\SYSTEM privileges:
PsExec.exe -i -s powershell.exe
Lists the contents of a directory and sorts files by size:
Get-ChildItem 'C:\System Volume Information\' -Force | Sort-Object Length -Descending| Select-Object Name, @{Name='Size(Mb)'; Expression={[int]($_.Length / 1MB)}}
To find the total size of the directory, use the following PowerShell command
(Get-ChildItem 'C:\System Volume Information\' -force | measure Length -s).sum / 1GbWhat is stored in the System Volume Information folder? I found information about the following services that store their files in this folder (this list is not exhaustive):
- WindowsImageBackup — system restore points on desktop Windows versions, or System State backups made using Windows Server Backup (
wbadmin) in the server OSs;- Indexing Service database used for fast file searching (including Outlook search);
- Distributed Link Tracking Service database;
- Drive snapshots created by Volume Shadow Copy service, which can be used to restore previous versions of files. A separate file is created for each snapshot, with a long ID as the name;
- NTFS disk quotas;
- Base and chunks of the Data Deduplication service;
- DFS Replication database (dfsr.db);
- Storage Service (StorSvc) WPSettings.dat file;
- In the case of USB drives, this directory contains the IndexerVolumeGuid file, which stores the unique drive label that is used by Windows Search service;
- AppxProgramDataStaging, AppxStaging – backups of UWP Windows apps (can be used to restore after removing Microsoft Store applications)
- CHKDSK log;
- AadRecoveryPasswordDelete and ClientRecoveryPasswordRotation – BitLocker directories used when storing the BitLocker recovery key in AD or Azure Entra ID.
Note. Do not manually delete files in the System Volume Information directory, as it contains important information, including that required for system recovery.Delete Shadow Copies in System Volume Information
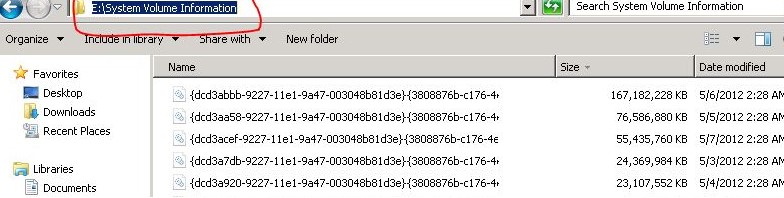
The shadow copies created by VSS are most often the cause of the large System Volume Information directory problem. The screenshot below shows that there is a system file in the System Volume Information folder that is larger than 120 GB.
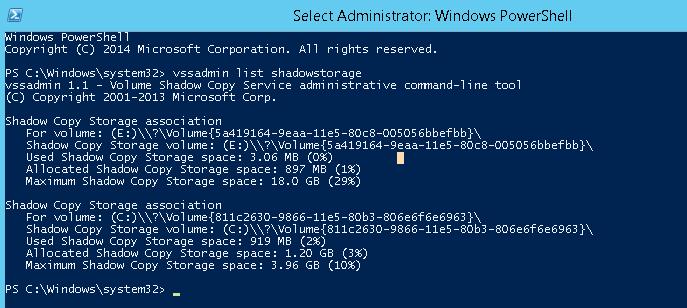
For a quick cleanup of the System Volume Information directory, you can delete old volume shadow copies. List information about the drives for which VSS creates shadow copies
vssadmin list shadowstorage
vssadmin 1.1 - Volume Shadow Copy Service administrative command-line tool
(C) Copyright 2001-2013 Microsoft Corp.
Shadow Copy Storage association
For volume: (E:)\\?\Volume{5a419164-9eba-11e5-84c5-004046bbefbb}\
Shadow Copy Storage volume: (E:)\\?\Volume{5a419164-9eba-11e5-84c5-004046bbefbb}\
Used Shadow Copy Storage space: 3.08 MB (0%)
Allocated Shadow Copy Storage space: 896 MB (1%)
Maximum Shadow Copy Storage space: 19.0 GB (29%)
Shadow Copy Storage association
For volume: (C:)\\?\Volume{843c6330-9866-11e5-80b3-806e6f6e6942}\
Shadow Copy Storage volume: (C:)\\?\Volume{843c6330-9866-11e5-80b3-806e6f6e6942}\
Used Shadow Copy Storage space: 912 MB (2%)
Allocated Shadow Copy Storage space: 1.20 GB (3%)
Maximum Shadow Copy Storage space: 3.98 GB (10%)
The tool displays the current and maximum size of shadow copy data for each drive. By default, Windows reserves 10% of disk space for shadow copies.
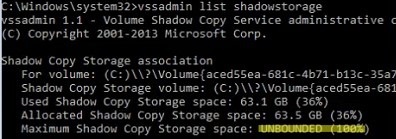
The screenshot below shows that there is no limit to the size of the shadow copies on the current volume. In this case, the VSS shadow copy files can take up all the disk space.
Maximum Shadow Copy Storage space: UNBOUNDED (100%)
The settings for the VSS disk quota may change the backup application that you have installed on your computer.You can use the vssadmin command to reduce the disk quota for VSS copies to 2GB:
vssadmin resize shadowstorage /on=c: /for=c: /maxsize=2GBOr you can specify the percentage of available volume space:
vssadmin resize shadowstorage /on=c: /for=c: /maxsize=10%
vssadmin 1.1 - Volume Shadow Copy Service administrative command-line tool
(C) Copyright 2001-2013 Microsoft Corp.
Successfully resized the shadow copy storage association
Then (in Windows 10 and 11) display a list of available shadow copies for the C: system drive, with their creation dates:
VSSADMIN list shadows /for=c:To free up space on your drive, delete the oldest shadow copy:
vssadmin delete shadows /for=C: /oldest
You can delete all VSS snapshots:
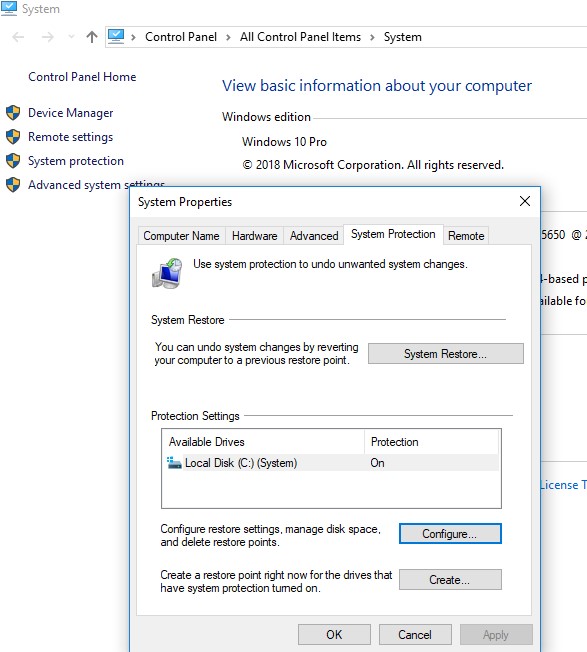
vssadmin delete shadows /for=C: /allYou can also use System Protection in the Control Panel to change the automatic restore point settings. Run the command
systempropertiesprotection, select your system drive, and click Configure.
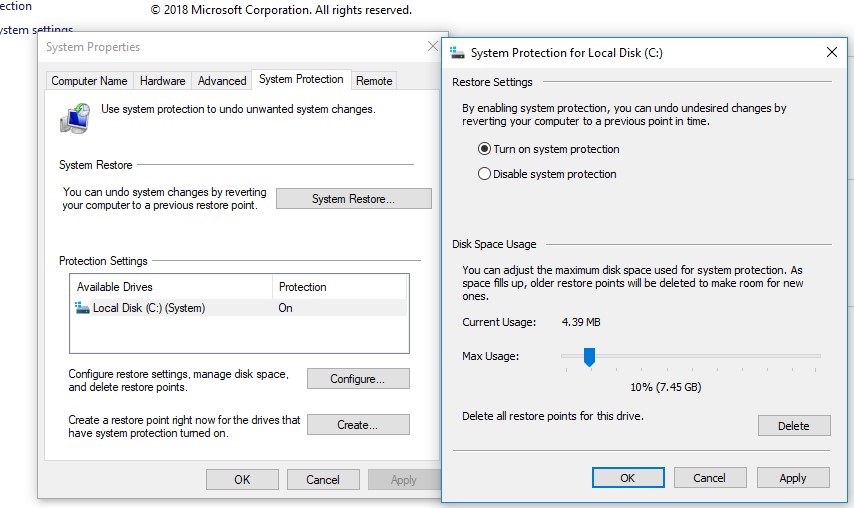
Here you can:
- Enable/disable system protection;
- Check the amount of disk space used to store imaged backups;
- Change restore point quota settings;
- Delete all existing restore points.
To reduce the size of the System Volume Information directory you can also:
- Move the VSS snapshots to another NTFS drive (
vssadmin add shadowstorage /for=c: /on=d: /maxsize=30%);- Disable or reconfigure the Windows File History feature;
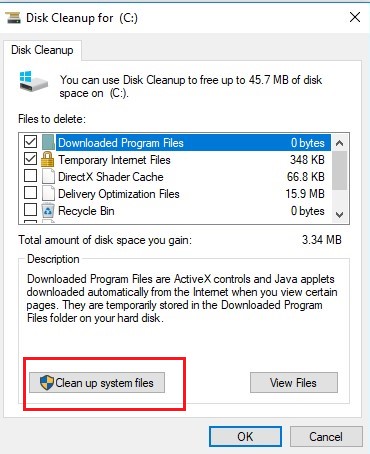
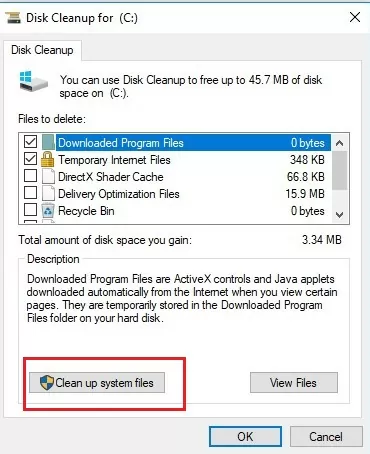
- Clean up system files using the built-in cleanmgr.exe tool (disk properties -> Disk Cleanup).
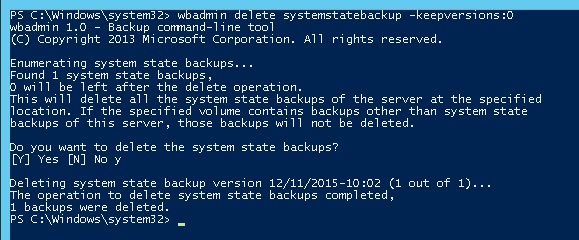
If you create system state backups using WSB (Windows Server Backup), you can delete all old copies of the system state by running the command:
wbadmin delete systemstatebackup -keepversions:0
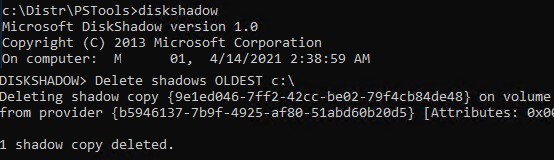
To quickly clean up old versions of VSS snapshots on Windows Server, use the diskshadow tool:
DiskShadow

Delete shadows OLDEST c:\
The oldest shadow copy (snapshot) of the volume is deleted each time the command is run.
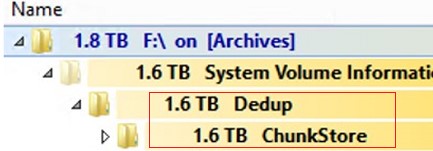
Clean Up Dedup ChunkStore in System Volume Information
You may notice that the Dedup\ChunkStore directory takes up a lot of space when you analyze the contents of the System Volume Information directory on Windows Server. This means that File Deduplication is enabled for this volume
When the Windows Server deduplication service finds identical chunks (fragments) in files, it replaces them with a link to a unique chunk stored in the System Volume Information directory. If you move or delete optimized files from a deduplicated volume, the old chunks are not deleted immediately. These chunks are removed by a special GarbageCollection task that runs once a week.
Do not completely disable deduplication for a volume (Start-DedupJob -Volume D: -Type Unoptimization) until you are sure that you have enough free disk space to store the unoptimized files.To start the process of removing unused chunks immediately, run the PowerShell command:
start-dedupjob -Volume C: -Type GarbageCollectionThe next task checks the integrity of the remaining chunks:
start-dedupjob -Volume C: -Type DataScrubbingTo monitor these tasks, use the cmdlet:
Get-DedupJobWhen the task is complete, any unused chunks are deleted from the System Volume Information directory.
There are several additional methods you can use to clean the system drive in Windows:
- Cleaning the WinSxS folder
- Delete inactive user profiles
- Delete old Windows update files using the command:
Dism.exe /Online /Cleanup-Image /StartComponentCleanup /ResetBase

https://woshub.com/how-to-clean-up-system-volume-information-folder/
Windows automatically creates a hidden System Volume Information directory in the root of each connected NTFS drive (whether a local HDD/SSD drive or a removable USB drive). The size of the Volume Information Directory may be tens or hundreds of GBs, occupying most of the hard drive free space. This article explains how the System Volume Information folder is used in Windows, what is stored in it, and how to clean it properly.

What is the System Volume Information Directory and How to Access It
The System Volume Information directory is located at the root of each Windows hard disk drive and is hidden by default. To view this directory, enable Windows File Explorer to show system files (Options -> View -> uncheck Hide protected operation system files (Recommended)).

This directory can only be accessed by the NT AUTHORITY\SYSTEM account. Even the built-in Windows administrator won’t be able to open and view the contents of the System Volume Information directory. If you try to open the folder in the File Explorer, you will get an error:
 Location is not available.
C:\System Volume Information is not accessible.
Access is denied.
![] Location is not available. C:\System Volume Information is not accessible. Access is denied](https://woshub.com/wp-content/uploads/2016/04/System-Volume-Information-Access-is-denied.jpg)
takeown /f "C:\System Volume information"

icacls "C:\System Volume Information" /grant woshub\jwolf:F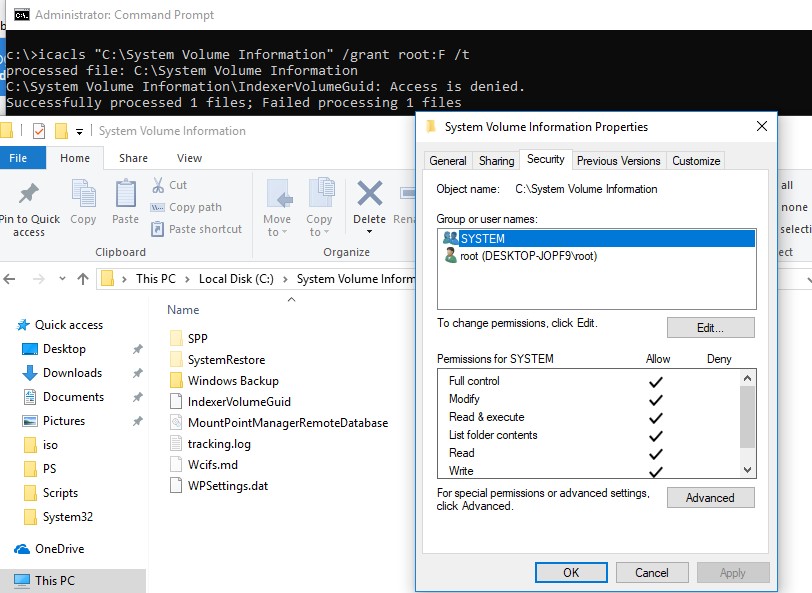
But it doesn’t make a lot of sense. In addition, you may accidentally delete important files from the folder.
To restore the original permissions on the System Volume Information folder, run:
icacls "C:\System Volume Information" /setowner "NT Authority\System"

icacls "C:\System Volume Information" /remove woshub\jwolf
You can view the contents of the System Volume Information directory by running the PowerShell console with NT AUTHORITY\SYSTEM privileges:
PsExec.exe -i -s powershell.exe
Lists the contents of a directory and sorts files by size:
Get-ChildItem 'C:\System Volume Information\' -Force | Sort-Object Length -Descending| Select-Object Name, @{Name='Size(Mb)'; Expression={[int]($_.Length / 1MB)}}

To find the total size of the directory, use the following PowerShell command
(Get-ChildItem 'C:\System Volume Information\' -force | measure Length -s).sum / 1Gb
What is stored in the System Volume Information folder? I found information about the following services that store their files in this folder (this list is not exhaustive):
- WindowsImageBackup — system restore points on desktop Windows versions, or System State backups made using Windows Server Backup (
wbadmin) in the server OSs; - Indexing Service database used for fast file searching (including Outlook search);
- Distributed Link Tracking Service database;
- Drive snapshots created by Volume Shadow Copy service, which can be used to restore previous versions of files. A separate file is created for each snapshot, with a long ID as the name;

- NTFS disk quotas;
- Base and chunks of the Data Deduplication service;
- DFS Replication database (dfsr.db);
- Storage Service (StorSvc) WPSettings.dat file;
- In the case of USB drives, this directory contains the IndexerVolumeGuid file, which stores the unique drive label that is used by Windows Search service;
- AppxProgramDataStaging, AppxStaging – backups of UWP Windows apps (can be used to restore after removing Microsoft Store applications)
- CHKDSK log;
- AadRecoveryPasswordDelete and ClientRecoveryPasswordRotation – BitLocker directories used when storing the BitLocker recovery key in AD or Azure Entra ID.
Delete Shadow Copies in System Volume Information
The shadow copies created by VSS are most often the cause of the large System Volume Information directory problem. The screenshot below shows that there is a system file in the System Volume Information folder that is larger than 120 GB.
For a quick cleanup of the System Volume Information directory, you can delete old volume shadow copies. List information about the drives for which VSS creates shadow copies
vssadmin list shadowstorage
vssadmin 1.1 - Volume Shadow Copy Service administrative command-line tool
(C) Copyright 2001-2013 Microsoft Corp.
Shadow Copy Storage association
For volume: (E:)\\?\Volume{5a419164-9eba-11e5-84c5-004046bbefbb}\
Shadow Copy Storage volume: (E:)\\?\Volume{5a419164-9eba-11e5-84c5-004046bbefbb}\
Used Shadow Copy Storage space: 3.08 MB (0%)
Allocated Shadow Copy Storage space: 896 MB (1%)
Maximum Shadow Copy Storage space: 19.0 GB (29%)
Shadow Copy Storage association
For volume: (C:)\\?\Volume{843c6330-9866-11e5-80b3-806e6f6e6942}\
Shadow Copy Storage volume: (C:)\\?\Volume{843c6330-9866-11e5-80b3-806e6f6e6942}\
Used Shadow Copy Storage space: 912 MB (2%)
Allocated Shadow Copy Storage space: 1.20 GB (3%)
Maximum Shadow Copy Storage space: 3.98 GB (10%)
The tool displays the current and maximum size of shadow copy data for each drive. By default, Windows reserves 10% of disk space for shadow copies.
The screenshot below shows that there is no limit to the size of the shadow copies on the current volume. In this case, the VSS shadow copy files can take up all the disk space.
Maximum Shadow Copy Storage space: UNBOUNDED (100%)
You can use the vssadmin command to reduce the disk quota for VSS copies to 2GB:
vssadmin resize shadowstorage /on=c: /for=c: /maxsize=2GB
Or you can specify the percentage of available volume space:
vssadmin resize shadowstorage /on=c: /for=c: /maxsize=10%

vssadmin 1.1 - Volume Shadow Copy Service administrative command-line tool
(C) Copyright 2001-2013 Microsoft Corp.
Successfully resized the shadow copy storage association
Then (in Windows 10 and 11) display a list of available shadow copies for the C: system drive, with their creation dates:
VSSADMIN list shadows /for=c:
To free up space on your drive, delete the oldest shadow copy:
vssadmin delete shadows /for=C: /oldest

You can delete all VSS snapshots:
vssadmin delete shadows /for=C: /all
You can also use System Protection in the Control Panel to change the automatic restore point settings. Run the command systempropertiesprotection, select your system drive, and click Configure.
Here you can:
- Enable/disable system protection;
- Check the amount of disk space used to store imaged backups;
- Change restore point quota settings;
- Delete all existing restore points.
To reduce the size of the System Volume Information directory you can also:
- Move the VSS snapshots to another NTFS drive (
vssadmin add shadowstorage /for=c: /on=d: /maxsize=30%); - Disable or reconfigure the Windows File History feature;
- Clean up system files using the built-in cleanmgr.exe tool (disk properties -> Disk Cleanup).
If you create system state backups using WSB (Windows Server Backup), you can delete all old copies of the system state by running the command:
wbadmin delete systemstatebackup -keepversions:0
To quickly clean up old versions of VSS snapshots on Windows Server, use the diskshadow tool:
DiskShadow

Delete shadows OLDEST c:\
The oldest shadow copy (snapshot) of the volume is deleted each time the command is run.
Clean Up Dedup ChunkStore in System Volume Information
You may notice that the Dedup\ChunkStore directory takes up a lot of space when you analyze the contents of the System Volume Information directory on Windows Server. This means that File Deduplication is enabled for this volume
When the Windows Server deduplication service finds identical chunks (fragments) in files, it replaces them with a link to a unique chunk stored in the System Volume Information directory. If you move or delete optimized files from a deduplicated volume, the old chunks are not deleted immediately. These chunks are removed by a special GarbageCollection task that runs once a week.
Start-DedupJob -Volume D: -Type Unoptimization ) until you are sure that you have enough free disk space to store the unoptimized files.To start the process of removing unused chunks immediately, run the PowerShell command:
start-dedupjob -Volume C: -Type GarbageCollection
The next task checks the integrity of the remaining chunks:
start-dedupjob -Volume C: -Type DataScrubbing
To monitor these tasks, use the cmdlet:
Get-DedupJob
When the task is complete, any unused chunks are deleted from the System Volume Information directory.
- Cleaning the WinSxS folder
- Delete inactive user profiles
- Delete old Windows update files using the command:
Dism.exe /Online /Cleanup-Image /StartComponentCleanup /ResetBase